
一、环境配置配置
1.配置selinux
setenforce 0
getenforce
sed -i 's/SELINUX=enforcing/SELINUX=disabled/g' /etc/selinux/config
2.关闭防火墙(或按需设置入口策略)
systemctl stop firewalld.service
systemctl disable firewalld
3.安装软件依赖包
yum -y install gcc
yum -y install python*
yum -y install perl-ExtUtils-Embed*
yum -y install zlib-devel*
yum -y install readline*
二、安装PostgreSQL数据库
这里采用编译安装的方法,rpm安装的方法在另一篇文章有
1.创建用户
groupadd postgres
useradd -g postgres postgres
2.解压postgresql-13.5.tar.gz并创建数据库目录赋予权限
tar xf postgresql-13.5.tar.gz -C /mnt/
mkdir -p /usr/local/postgres/
chown -R postgres:postgres /usr/local/postgres/
3.下载编译安装所需依赖
yum install -y perl-ExtUtils-Embed readline-devel* zlib-devel* pam-devel libxml2-devel libxslt-devel openldap-devel python-devel gcc-c++ openssl-devel cmake
4.进行编译安装
cd /mnt/postgresql-13.5
./configure --prefix=/usr/local/postgres --with-openssl
make && make install
5.创建data目录和日志存储目录
mkdir -p /usr/local/postgres/data
cd /usr/local/postgres/ && chown -R postgres:postgres bin data include lib share
mkdir -p /home/postgres/
touch /home/postgres/startup.log
chown -R postgres:postgres /home/postgres
6.初始化数据库并启动(只在主数据库上执行,从数据库不需要,后续直接克隆)
su - postgres -c "/usr/local/postgres/bin/initdb -D /usr/local/postgres/data/ -E UTF-8 --locale=zh_CN.UTF-8"
su - postgres -c "/usr/local/postgres/bin/pg_ctl start -D /usr/local/postgres/data/ -l /home/postgres/startup.log"
7.添加环境变量
echo 'PATH=$PATH:$HOME/.local/bin:$HOME/bin:/usr/local/postgres/bin' >> ~/.bash_profile
echo 'PGDATA=/usr/local/postgres/data' >> ~/.bash_profile
source ~/.bash_profile
8.查看当前版本
psql --version
9.使用systemctl管理数据库
#vi /etc/systemd/system/postgresql.service


[Unit]
Description=postgresql.service
After=network.target

[Service]
Type=forking
User=postgres
Group=postgres
WorkingDirectory=/usr/local/postgres
ExecStart=/usr/local/postgres/bin/pg_ctl start -D /usr/local/postgres/data -l /home/postgres/startup.log
ExecReload=/usr/local/postgres/bin/pg_ctl restart -D /usr/local/postgres/data -l /home/postgres/startup.log
ExecStop=/usr/local/postgres/bin/pg_ctl stop -D /usr/local/postgres/data -l /home/postgres/startup.log
#PrivateTmp=true

[Install]
WantedBy=multi-user.target
三、安装repmgr软件(每台数据库服务器都要安装)
1.安装依赖包
yum install -y flex libselinux-devel libxml2-devel libxslt-devel openssl-devel pam-devel readline-devel
2.安装repmgr软件
tar -xf repmgr-5.3.3.tar.gz -C /mnt/
cd /mnt/repmgr-5.3.3/
./configure  PG_CONFIG=/usr/local/postgres/bin/pg_config
make && make install
ls /usr/local/postgres/bin/ |grep repmgr

四、修改配置文件
1.创建相关目录
mkdir -p /usr/local/postgres/data/pg_archive
mkdir -p /usr/local/postgres/data/pg_log
mkdir -p /usr/local/postgres/data/repmgr_log
chown -R postgres:postgres /usr/local/postgres/data
2.配置postgresql.conf文件(只配置主数据库)
shared_preload_libraries = 'repmgr' #预加载repmgr模块
listen_addresses = '*'
archive_mode = on
archive_command = 'test ! -f /usr/local/postgres/data/pg_archive/%f && cp %p /usr/local/postgres/data/pg_archive/%f' #要手动创建/usr/local/postgres/data/pg_archive/文件夹并赋予postgres属主属组
max_wal_senders = 10
max_replication_slots = 10
wal_level = replica
hot_standby = on
wal_log_hints = on #常规流复制(wal_level=replica)且无修复工具需求时可关闭以减少 WAL 日志量
logging_collector = on
log_statement=ddl
log_destination=stderr
log_directory='/usr/local/postgres/data/pg_log'
log_filename='postgresql-%a.log'
log_truncate_on_rotation=on
log_rotation_age=1d
log_rotation_size=10MB #若设置为0(yum安装的默认是0),若配置中同时存在 log_rotation_age = 1d 且 log_rotation_size = 0,表示日志仅按每天轮转一次,不受文件大小影响。
log_line_prefix='%t [%p]: [%l-1] user=%u,db=%d,app=%a,client=%h'
log_checkpoints=on
log_lock_waits=on
log_autovacuum_min_duration=0 #谨慎开启!记录 所有 autovacuum 操作的详细信息(表名、耗时等),用于监控清理效率与异常
log_temp_files=0 #按需开启 临时文件频繁时可能增加日志量。
lc_messages='C'
3.创建repmgr用户
createuser -s repmgr
createdb repmgr -O repmgr
psql -Upostgres -c 'ALTER USER repmgr SET search_path TO repmgr, "$user", public;
su postgres
source ~/.bash_profile
psql
create user repmgr superuser ;
create database repmgr owner repmgr;
4.配置pg_hba.conf文件(只配置主数据库)
# "local" is for Unix domain socket connections only
local   all             all                                     trust
# IPv4 local connections:
host    all             all             127.0.0.1/32            trust
host    repmgr          repmgr          192.168.100.100/24      trust
host    repmgr          repmgr          192.168.100.101/24      trust
host    repmgr          repmgr          192.168.100.102/24      trust
host    all             all             0.0.0.0/0               md5
# IPv6 local connections:
host    all             all             ::1/128                 trust
# Allow replication connections from localhost, by a user with the
# replication privilege.
local   replication     all                                     trust
host    replication     all             127.0.0.1/32            trust
host    replication     all             ::1/128                 trust
host    replication     repmgr          192.168.100.100/24      trust
host    replication     repmgr          192.168.100.101/24      trust
host    replication     repmgr          192.168.100.102/24      trust


重启数据库加载配置
/usr/local/postgres/bin/pg_ctl restart -D /usr/local/postgres/data/ -l /home/postgres/startup.log
5.repmgr配置(这里提供一二两种)
vi /usr/local/postgres/repmgr.conf
主节点配置(一)
# 节点标识设置
node_id = 1
node_name = master
# 数据库连接信息
conninfo = 'host=192.168.100.100 user=repmgr dbname=repmgr connect_timeout=2'
# 数据目录路径
data_directory = '/usr/local/postgres/data/'
# PostgreSQL二进制目录路径
pg_bindir = '/usr/local/postgres/bin/'
config_directory='/usr/local/postgres/'
# 日志级别与日志文件位置
log_level = INFO
log_facility=STDERR
log_file = '/usr/local/postgres/data/repmgr_log/repmgrd.log'

# 故障切换策略设定
failover = automatic
# 提升从库为新主库的命令
promote_command = '/usr/local/postgres/bin/repmgr standby promote -f /usr/local/postgres/repmgr.conf'
# 从库跟随主库命令
follow_command='/usr/local/postgres/bin/repmgr standby follow -f /usr/local/postgres/repmgr.conf --upstream-node-id=%n'
# 监控历史记录存储选项
monitoring_history = true
# 监控间隔时间(秒)
monitor_interval_secs = 2
connection_check_type='ping'
# 重连尝试次数
reconnect_attempts = 3
# 两次重连之间的间隔时间(秒)
reconnect_interval = 5
# repmgrd文件
repmgrd_pid_file = '/usr/local/postgres/repmgrd.pid'
从节点1(一)
# 节点标识设置
node_id = 2
node_name = node01
# 数据库连接信息
conninfo = 'host=192.168.100.101 user=repmgr dbname=repmgr connect_timeout=2'
# 数据目录路径
data_directory = '/usr/local/postgres/data/'
# PostgreSQL二进制目录路径
pg_bindir = '/usr/local/postgres/bin/'
config_directory='/usr/local/postgres/'
# 日志级别与日志文件位置
log_level = INFO
log_facility=STDERR
log_file = '/usr/local/postgres/data/repmgr_log/repmgrd.log'

# 故障切换策略设定
failover = automatic
# 提升从库为新主库的命令
promote_command = '/usr/local/postgres/bin/repmgr standby promote -f /usr/local/postgres/repmgr.conf'
# 从库跟随主库命令
follow_command='/usr/local/postgres/bin/repmgr standby follow -f /usr/local/postgres/repmgr.conf --upstream-node-id=%n'
# 监控历史记录存储选项
monitoring_history = true
# 监控间隔时间(秒)
monitor_interval_secs = 2
connection_check_type='ping'
# 重连尝试次数
reconnect_attempts = 3
# 两次重连之间的间隔时间(秒)
reconnect_interval = 5
# repmgrd文件
repmgrd_pid_file = '/usr/local/postgres/repmgrd.pid'
从节点2(一)
# 节点标识设置
node_id = 3
node_name = node02
# 数据库连接信息
conninfo = 'host=192.168.100.102 user=repmgr dbname=repmgr connect_timeout=2'
# 数据目录路径
data_directory = '/usr/local/postgres/data/'
# PostgreSQL二进制目录路径
pg_bindir = '/usr/local/postgres/bin/'
config_directory='/usr/local/postgres/'
# 日志级别与日志文件位置
log_level = INFO
log_facility=STDERR
log_file = '/usr/local/postgres/data/repmgr_log/repmgrd.log'

# 故障切换策略设定
failover = automatic
# 提升从库为新主库的命令
promote_command = '/usr/local/postgres/bin/repmgr standby promote -f /usr/local/postgres/repmgr.conf'
# 从库跟随主库命令
follow_command='/usr/local/postgres/bin/repmgr standby follow -f /usr/local/postgres/repmgr.conf --upstream-node-id=%n'
# 监控历史记录存储选项
monitoring_history = true
# 监控间隔时间(秒)
monitor_interval_secs = 2
connection_check_type='ping'
# 重连尝试次数
reconnect_attempts = 3
# 两次重连之间的间隔时间(秒)
reconnect_interval = 5
# repmgrd文件
repmgrd_pid_file = '/usr/local/postgres/repmgrd.pid'
vi /usr/local/postgres/repmgr.conf
主节点配置(二)
# 基本信息
node_id=1                                                             # 节点ID,高可用集群各节点标识
node_name='master'                                                    # 节点名称,高可用集群各节点名称
conninfo='host=192.168.100.100 user=repmgr dbname=repmgr connect_timeout=2'    # 本节点数据库连接信息
data_directory='/usr/local/postgres/data/'
replication_user='repmgr'
repmgr_bindir='/usr/local/postgres/bin/'
pg_bindir='/usr/local/postgres/bin/'
#shutdown_check_timeout=10

# 日志管理
log_level=INFO
log_file='/usr/local/postgres/data/repmgr_log/repmgrd.log'
log_status_interval=10

# failover设置
failover='automatic'      #手动是manual
promote_command='/usr/local/postgres/bin/repmgr standby promote -f /usr/local/postgres/repmgr.conf --log-to-file'
follow_command='/usr/local/postgres/bin/repmgr standby follow -f /usr/local/postgres/repmgr.conf --log-to-file --upstream-node-id=%n'

# 高可用参数设置
location='location1'                   # 多数据中心时标记服务器的位置,在故障转移期间用于检查当前主节点的可见性
priority=100                                                         # 节点优先级,选主时可能使用到(lsn > priority > node_id),0代表该节点不会被提升为主节点
monitoring_history=yes                                               # 是否将监控数据写入“monitoring_history”表
reconnect_interval=5                                                 # 故障转移之前,尝试重新连接的间隔(以秒为单位)
reconnect_attempts=3                                                 # 故障转移之前,尝试重新连接的次数
monitor_interval_secs=2
use_replication_slots=true
connection_check_type=ping          # ping: repmgr 使用PQPing() 方法测试连接
                                    # connection: 尝试与节点建立新的连接
                                    # query: 通过现有连接在节点上执行 SQL 语句
#primary_visibility_consensus=false # 主机可见性共识,轮询每个备机(假如还有witness的话)最后一次看到主库的时间,如果有任何备库最近看到了主库,就可以合理地推断出主库仍然可用,不应该启动故障转移

 # pg、repmgr服务管理命令
service_start_command='/usr/local/postgres/bin/pg_ctl -D /usr/local/postgres/data start -o \'-c config_file=/usr/local/postgres/data/postgresql.conf\' '
service_stop_command='/usr/local/postgres/bin/pg_ctl -D /usr/local/postgres/data stop'
service_restart_command='/usr/local/postgres/bin/pg_ctl -D /usr/local/postgres/data restart -o \'-c config_file=/usr/local/postgres/data/postgresql.conf\' '
service_reload_command='su - postgres -c \'/usr/local/postgres/bin/pg_ctl -D /usr/local/postgres/data reload\' '
repmgrd_pid_file='/tmp/repmgrd.pid'
repmgrd_service_start_command='/usr/local/postgres/bin/repmgrd -f /usr/local/postgres/repmgr.conf start'
repmgrd_service_stop_command='kill -9 `cat /tmp/repmgrd.pid`'
从节点1(二)
# 基本信息
node_id=2                                                             # 节点ID,高可用集群各节点标识
node_name='node1'                                                    # 节点名称,高可用集群各节点名称
conninfo='host=192.168.100.101 user=repmgr dbname=repmgr connect_timeout=2'    # 本节点数据库连接信息
data_directory='/usr/local/postgres/data/'
replication_user='repmgr'
repmgr_bindir='/usr/local/postgres/bin/'
pg_bindir='/usr/local/postgres/bin/'
#shutdown_check_timeout=10

# 日志管理
log_level=INFO
log_file='/usr/local/postgres/data/repmgr_log/repmgrd.log'
log_status_interval=10

# failover设置
failover='automatic'    #手动是manual
promote_command='/usr/local/postgres/bin/repmgr standby promote -f /usr/local/postgres/repmgr.conf --log-to-file'
follow_command='/usr/local/postgres/bin/repmgr standby follow -f /usr/local/postgres/repmgr.conf --log-to-file --upstream-node-id=%n'

# 高可用参数设置
location='location1'                   # 多数据中心时标记服务器的位置,在故障转移期间用于检查当前主节点的可见性
priority=100                                                         # 节点优先级,选主时可能使用到(lsn > priority > node_id),0代表该节点不会被提升为主节点
monitoring_history=yes                                               # 是否将监控数据写入“monitoring_history”表
reconnect_interval=5                                                 # 故障转移之前,尝试重新连接的间隔(以秒为单位)
reconnect_attempts=3                                                 # 故障转移之前,尝试重新连接的次数
monitor_interval_secs=2
use_replication_slots=true
connection_check_type=ping          # ping: repmgr 使用PQPing() 方法测试连接
                                    # connection: 尝试与节点建立新的连接
                                    # query: 通过现有连接在节点上执行 SQL 语句
#primary_visibility_consensus=false # 主机可见性共识,轮询每个备机(假如还有witness的话)最后一次看到主库的时间,如果有任何备库最近看到了主库,就可以合理地推断出主库仍然可用,不应该启动故障转移

 # pg、repmgr服务管理命令
service_start_command='/usr/local/postgres/bin/pg_ctl -D /usr/local/postgres/data start -o \'-c config_file=/usr/local/postgres/data/postgresql.conf\' '
service_stop_command='/usr/local/postgres/bin/pg_ctl -D /usr/local/postgres/data stop'
service_restart_command='/usr/local/postgres/bin/pg_ctl -D /usr/local/postgres/data restart -o \'-c config_file=/usr/local/postgres/data/postgresql.conf\' '
service_reload_command='su - postgres -c \'/usr/local/postgres/bin/pg_ctl -D /usr/local/postgres/data reload\' '
repmgrd_pid_file='/tmp/repmgrd.pid'
repmgrd_service_start_command='/usr/local/postgres/bin/repmgrd -f /usr/local/postgres/repmgr.conf start'
repmgrd_service_stop_command='kill -9 `cat /tmp/repmgrd.pid`'
从节点2(二)
# 基本信息
node_id=3                                                             # 节点ID,高可用集群各节点标识
node_name='node2'                                                    # 节点名称,高可用集群各节点名称
conninfo='host=192.168.100.102 user=repmgr dbname=repmgr connect_timeout=2'    # 本节点数据库连接信息
data_directory='/usr/local/postgres/data/'
replication_user='repmgr'
repmgr_bindir='/usr/local/postgres/bin/'
pg_bindir='/usr/local/postgres/bin/'
#shutdown_check_timeout=10

# 日志管理
log_level=INFO
log_file='/usr/local/postgres/data/repmgr_log/repmgrd.log'
log_status_interval=10

# failover设置
failover='automatic'     #手动是manual
promote_command='/usr/local/postgres/bin/repmgr standby promote -f /usr/local/postgres/repmgr.conf --log-to-file'
follow_command='/usr/local/postgres/bin/repmgr standby follow -f /usr/local/postgres/repmgr.conf --log-to-file --upstream-node-id=%n'

# 高可用参数设置
location='location1'                   # 多数据中心时标记服务器的位置,在故障转移期间用于检查当前主节点的可见性
priority=100                                                         # 节点优先级,选主时可能使用到(lsn > priority > node_id),0代表该节点不会被提升为主节点
monitoring_history=yes                                               # 是否将监控数据写入“monitoring_history”表
reconnect_interval=5                                                 # 故障转移之前,尝试重新连接的间隔(以秒为单位)
reconnect_attempts=3                                                 # 故障转移之前,尝试重新连接的次数
monitor_interval_secs=2
use_replication_slots=true
connection_check_type=ping          # ping: repmgr 使用PQPing() 方法测试连接
                                    # connection: 尝试与节点建立新的连接
                                    # query: 通过现有连接在节点上执行 SQL 语句
#primary_visibility_consensus=false # 主机可见性共识,轮询每个备机(假如还有witness的话)最后一次看到主库的时间,如果有任何备库最近看到了主库,就可以合理地推断出主库仍然可用,不应该启动故障转移

 # pg、repmgr服务管理命令
service_start_command='/usr/local/postgres/bin/pg_ctl -D /usr/local/postgres/data start -o \'-c config_file=/usr/local/postgres/data/postgresql.conf\' '
service_stop_command='/usr/local/postgres/bin/pg_ctl -D /usr/local/postgres/data stop'
service_restart_command='/usr/local/postgres/bin/pg_ctl -D /usr/local/postgres/data restart -o \'-c config_file=/usr/local/postgres/data/postgresql.conf\' '
service_reload_command='su - postgres -c \'/usr/local/postgres/bin/pg_ctl -D /usr/local/postgres/data reload\' '
repmgrd_pid_file='/tmp/repmgrd.pid'
repmgrd_service_start_command='/usr/local/postgres/bin/repmgrd -f /usr/local/postgres/repmgr.conf start'
repmgrd_service_stop_command='kill -9 `cat /tmp/repmgrd.pid`'
6.配置互信(每台数据库服务器都要执行)
passwd postgres
su postgres
ssh-keygen -t rsa -f ~/.ssh/id_rsa -N ""
主数据服务器192.168.100.100
ssh-copy-id -i ~/.ssh/id_rsa.pub [email protected]
ssh-copy-id -i ~/.ssh/id_rsa.pub [email protected]
备数据服务器192.168.100.101
ssh-copy-id -i ~/.ssh/id_rsa.pub [email protected]
ssh-copy-id -i ~/.ssh/id_rsa.pub [email protected]
备数据服务器192.168.100.102
ssh-copy-id -i ~/.ssh/id_rsa.pub [email protected]
ssh-copy-id -i ~/.ssh/id_rsa.pub [email protected]
五、repmgr集群配置
1.注册主节点
/usr/local/postgres/bin/repmgr -f /usr/local/postgres/repmgr.conf primary register --force
/usr/local/postgres/bin/repmgr -f /usr/local/postgres/repmgr.conf cluster show

primary代表为主库
2.从库克隆主库
在从库服务器上都执行
su postgres
/usr/local/postgres/bin/repmgr -h 192.168.100.100 -U repmgr -d repmgr -f /usr/local/postgres/repmgr.conf standby clone --dry-run
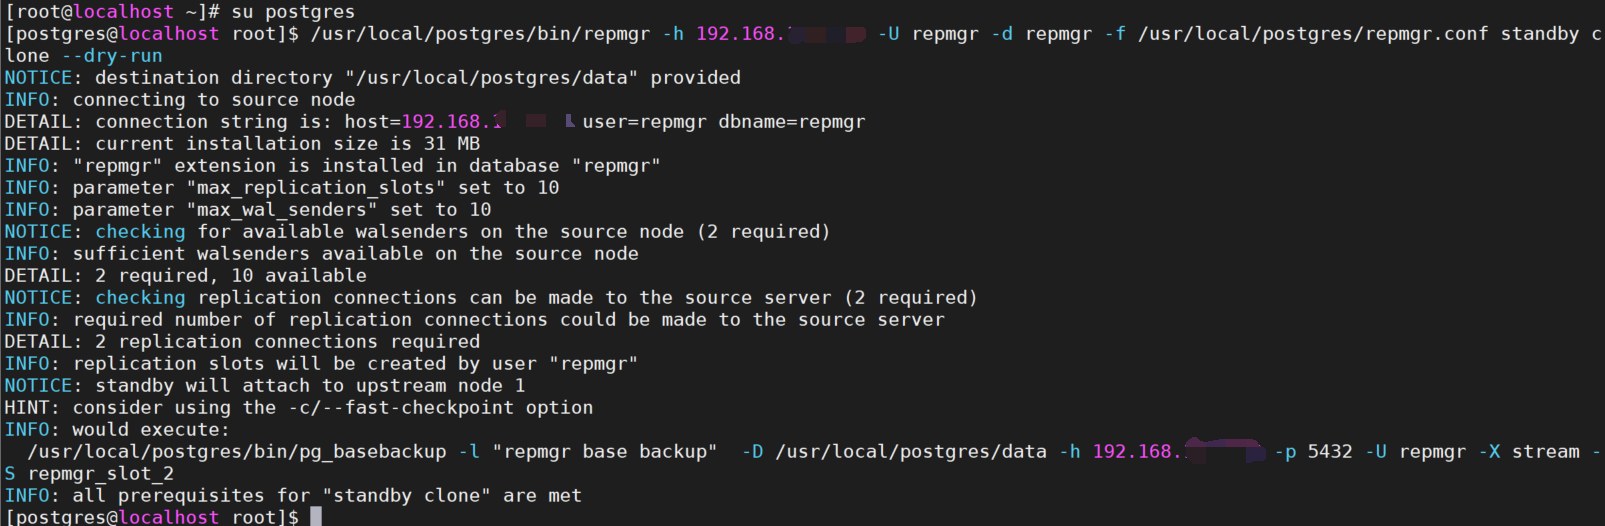
--dry-run此参数表示测试(dry run)并不会真正的执行!
测试无误就可以去掉--dry-run参数,正式执行了!
/usr/local/postgres/bin/repmgr -h 192.168.100.100 -U repmgr -d repmgr -f /usr/local/postgres/repmgr.conf standby clone
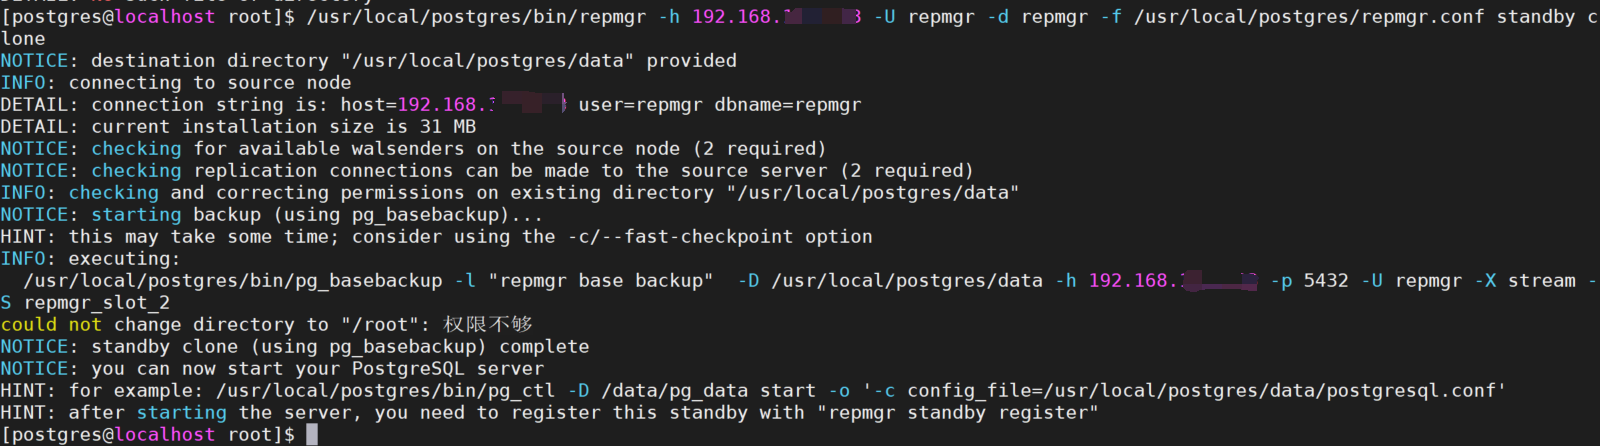
主节点数据目录中的配置文件也都被复制到了备节点的数据目录中,包括postgresql.conf, postgresql.auto.conf, pg_hba.conf和pg_ident.conf

启动从数据库
/usr/local/postgres/bin/pg_ctl start -D /usr/local/postgres/data/ -l /home/postgres/startup.log
3.查询流复制状态(在主数据库上执行)
su postgres
source ~/.bash_profile
psql
select * from pg_stat_replication ;

4.注册备节点(在备数据库上执行)
/usr/local/postgres/bin/repmgr -f /usr/local/postgres/repmgr.conf standby register --force
/usr/local/postgres/bin/repmgr -f /usr/local/postgres/repmgr.conf cluster show #查看集群状态


六、主备切换
1.手动切换(需要自己follow)
在要切换为新主库的备库服务器上执行
/usr/local/postgres/bin/repmgr -f /usr/local/postgres/repmgr.conf standby switchover   --dry-run
/usr/local/postgres/bin/repmgr -f /usr/local/postgres/repmgr.conf standby switchover
/usr/local/postgres/bin/repmgr -f /usr/local/postgres/repmgr.conf cluster show
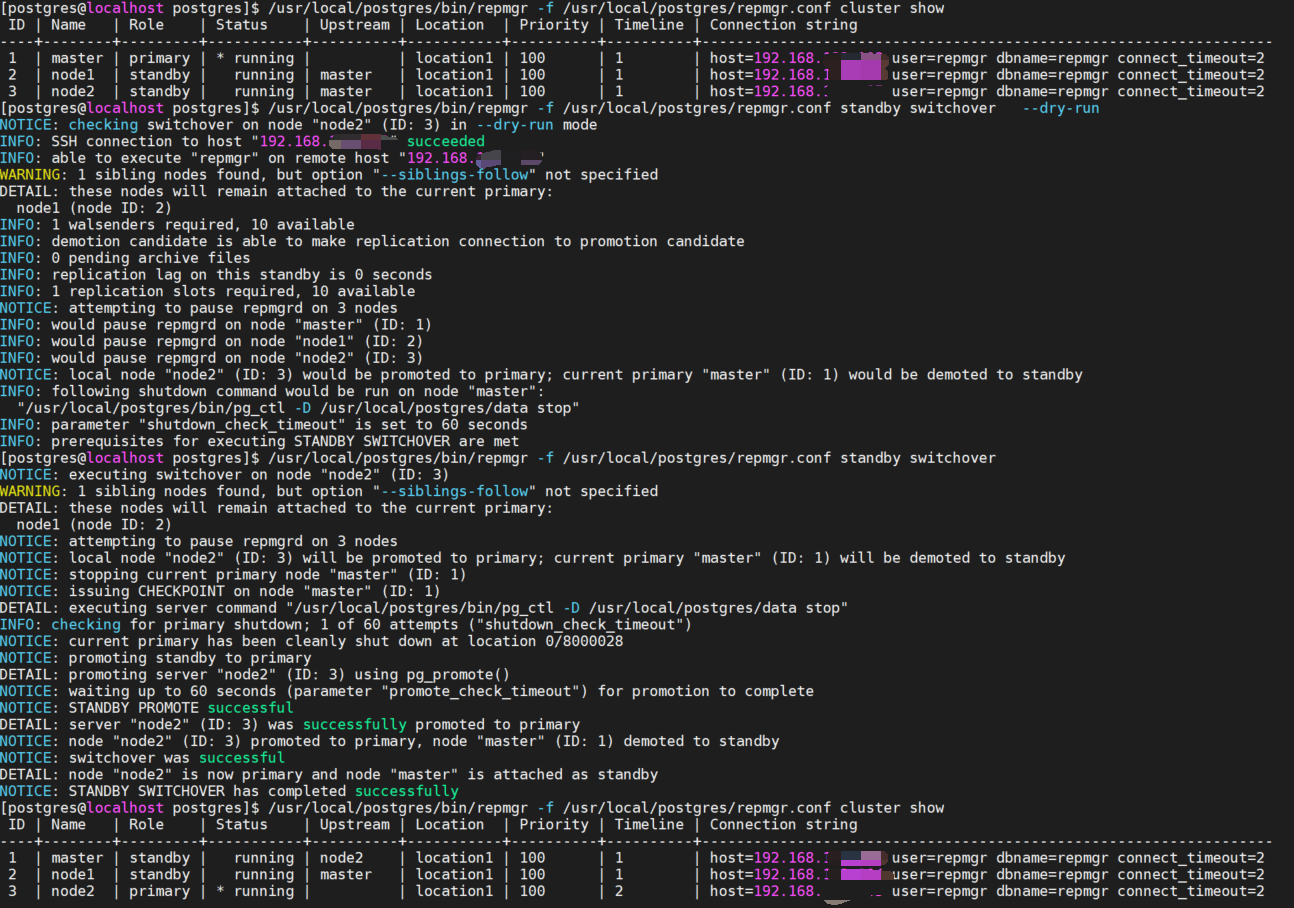
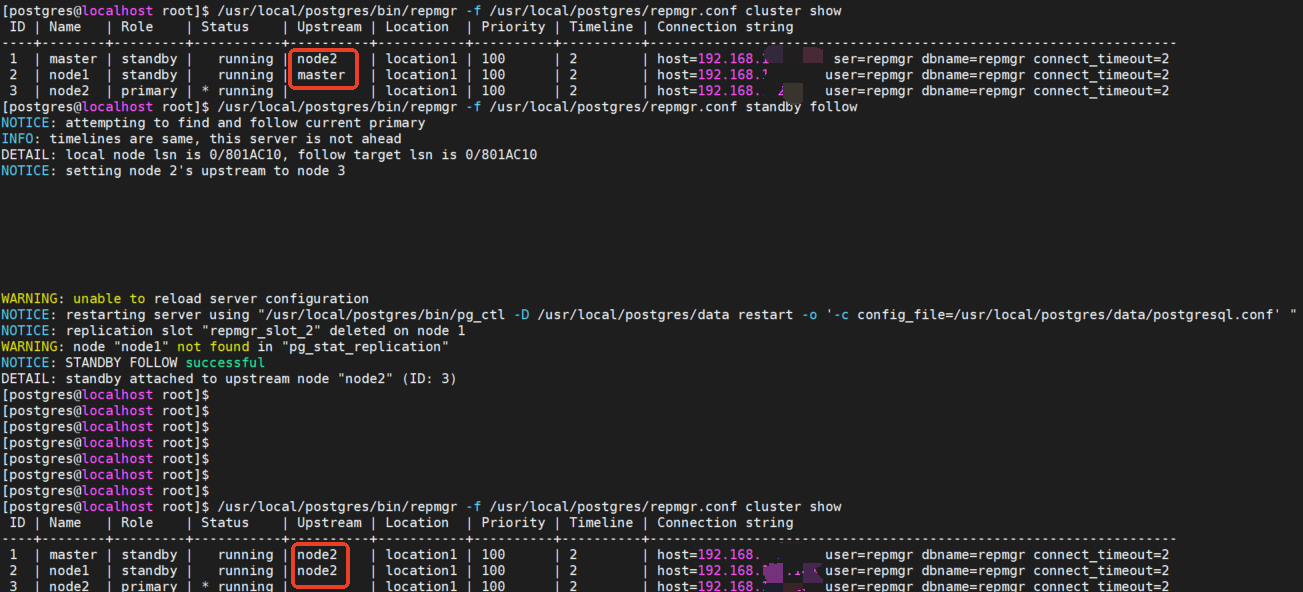
此时备库的上游节点还未指向新主库

修改其余备库的上游节点指向新主库(在未指向新主库的备库服务器上执行)
/usr/local/postgres/bin/repmgr -f /usr/local/postgres/repmgr.conf standby follow
/usr/local/postgres/bin/repmgr -f /usr/local/postgres/repmgr.conf cluster show
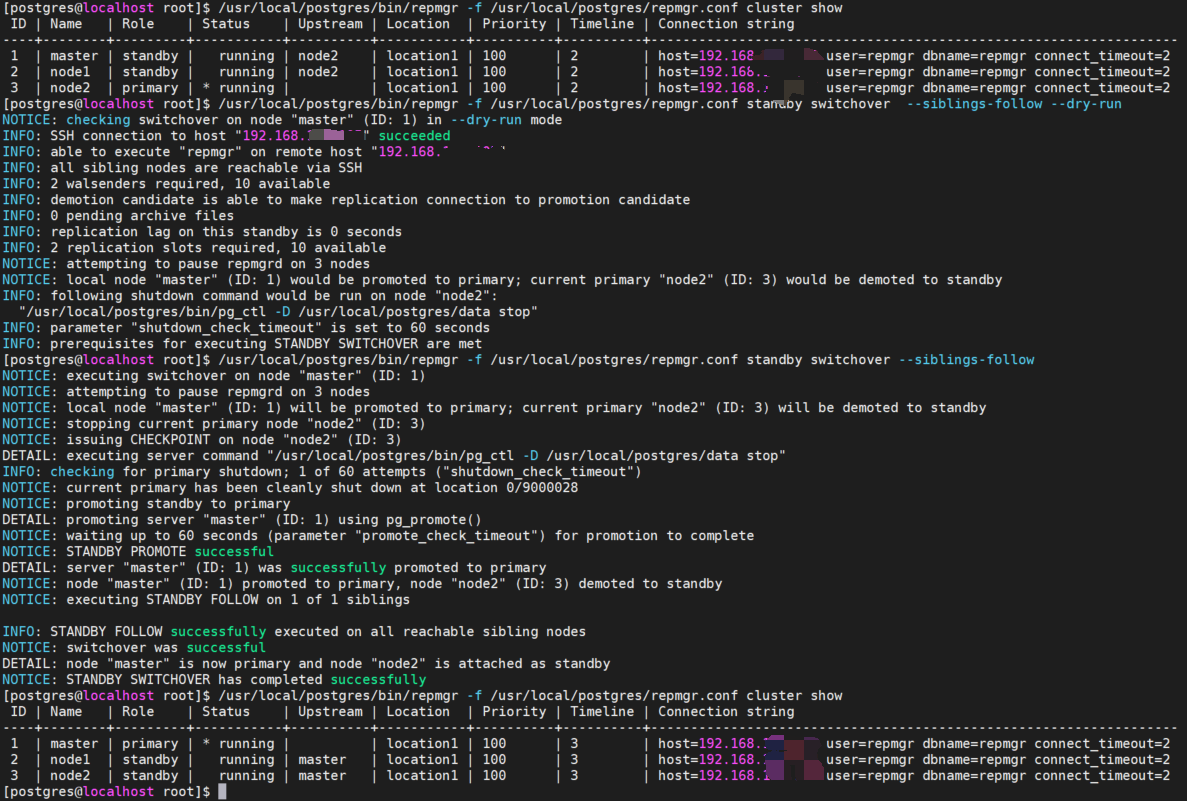
2.手动切换(不需要自己follow)
在要切换为新主库的备库服务器上执行
/usr/local/postgres/bin/repmgr -f /usr/local/postgres/repmgr.conf standby switchover  --siblings-follow --dry-run
/usr/local/postgres/bin/repmgr -f /usr/local/postgres/repmgr.conf standby switchover --siblings-follow
3.使用repmgrd实现自动failover
修改每台数据库的postgresql.conf 文件
shared_preload_libraries = 'repmgr'
重启数据库
/usr/local/postgres/bin/pg_ctl restart -D /usr/local/postgres/data/ -l /home/postgres/startup.log
检查是否有repmgr日志文件,没有则创建日志文件
su postgres
ls /usr/local/postgres/data/repmgr_log/
touch /usr/local/postgres/data/repmgr_log/repmgrd.log  #没有则执行此命令创建
启动repmgrd服务
repmgrd start -f /usr/local/postgres/repmgr.conf
测试前集群状态

关闭主库测试自动failover
/usr/local/postgres/bin/pg_ctl stop -D /usr/local/postgres/data/ -l /home/postgres/startup.log
在从库服务器上查看集群状态
/usr/local/postgres/bin/repmgr -f /usr/local/postgres/repmgr.conf cluster show

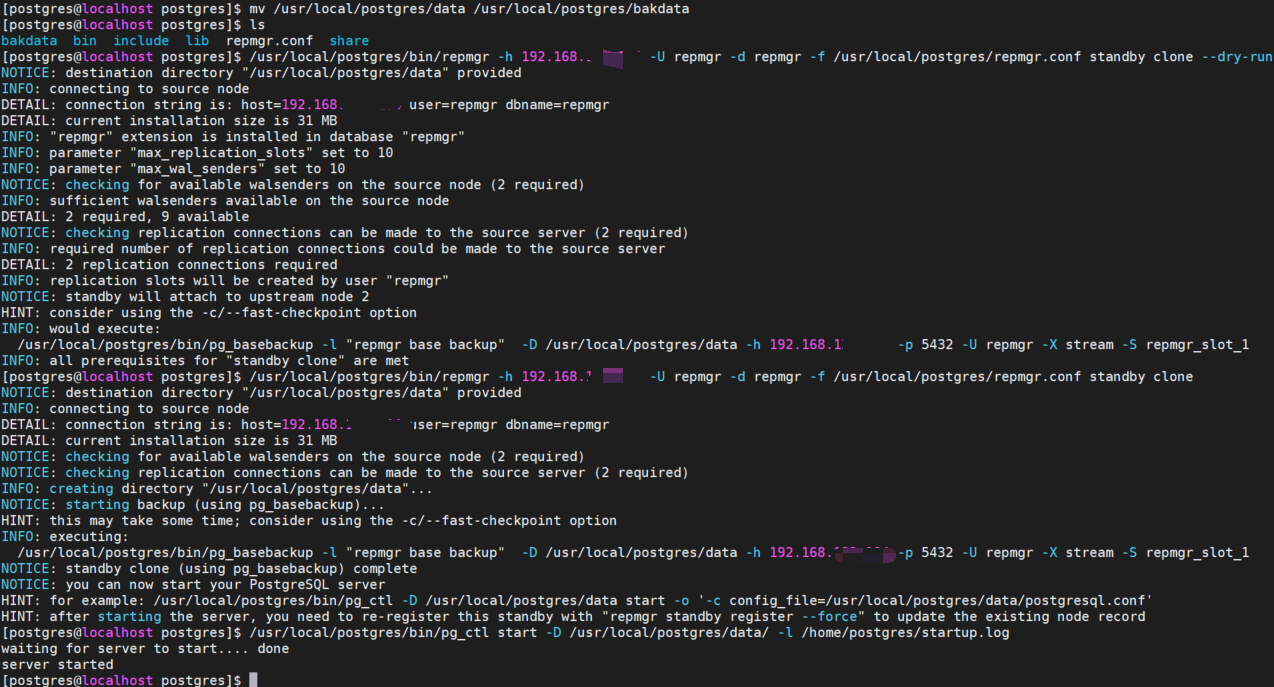
宕机的旧主库重新克隆自动升级的新主库(在宕机的旧主库上执行)
mv /usr/local/postgres/data /usr/local/postgres/bakdata
/usr/local/postgres/bin/repmgr -h 192.168.100.101 -U repmgr -d repmgr -f /usr/local/postgres/repmgr.conf standby clone --dry-run
/usr/local/postgres/bin/repmgr -h 192.168.100.101 -U repmgr -d repmgr -f /usr/local/postgres/repmgr.conf standby clone
/usr/local/postgres/bin/pg_ctl start -D /usr/local/postgres/data/ -l /home/postgres/startup.log

查询流复制状态(在现主数据库上执行)
su postgres
source ~/.bash_profile
psql
select * from pg_stat_replication ;

注册备节点(在备数据库上执行)
/usr/local/postgres/bin/repmgr -f /usr/local/postgres/repmgr.conf standby register --force
/usr/local/postgres/bin/repmgr -f /usr/local/postgres/repmgr.conf cluster show #查看集群状态

ps.删除pgsql中pg_wal60天前的日志
find /var/lib/pgsql/12/data/pg_wal -type f -mtime +60 -delete